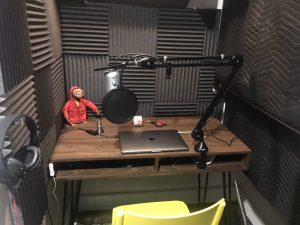
Podcasting has become one of the most popular media formats today, with everyone from top celebrities to stay-at-home parents launching their own shows. Whether you’re sharing your expertise, interviewing guests, or simply telling a story, setting up a podcasting studio at home is the key to ensuring your recordings sound professional from the get-go.

Acoustics and Essentials for Getting Started with a Home Studio
Creating a quality podcasting studio doesn’t have to be complicated or expensive, but it does require a thoughtful approach. Here are some essential tips to help you set up your home podcasting studio for success:
- Choose the Right Space for Recording
The first step in setting up your podcasting studio is selecting the right space. Whether you have an entire room to dedicate to podcasting or you’re using a corner of your home office, the key is to choose an enclosed space. Recording in a secluded area will minimize the impact of ambient noise and provide better sound quality than trying to record in an open space, like a living room or kitchen.
Tip: A room with fewer hard surfaces, such as carpets or fabric furniture, will naturally reduce echoes and improve sound quality. - Soundproof Your Studio for Professional Quality Audio
Nothing detracts from a podcast more than poor sound quality. If your podcast has unwanted noise, echoes, or reverb, it will give off an amateur vibe, no matter how great your content is. That’s why soundproofing your recording space is a must.
Here are some effective ways to soundproof your home podcasting studio:
Acoustic Foam: Install acoustic eggcrate foam on the walls to absorb sound and reduce echo.
Heavy Curtains: Hang thick curtains over windows to block out external noise.
Soundproofing the Door: Cover the back of the door with sound-absorbing fabric to prevent sound leakage.
Tip: The more you can minimize noise, the clearer your podcast will sound. Consider adding floor mats or rugs to absorb sound further.
- Set a Realistic Budget for Equipment
Podcasting equipment can range from budget-friendly options to high-end professional gear. If you’re just starting out, it’s best to stick to entry-level equipment to test the waters. However, if you’re committed to podcasting long-term, investing in slightly more expensive, higher-quality equipment can give your podcast a professional edge from the start.
Here are some essential podcasting equipment options to consider:
Microphone: A high-quality microphone is a must-have for clear audio. USB microphones are a good starting point, while XLR mics provide more flexibility and professional sound quality.
Headphones: A good pair of headphones helps you monitor your audio while recording and editing.
Mixing Console: If you plan to have multiple guests or want to control the audio levels, a mixing console can be a valuable addition.
Editing Software: Invest in software that allows you to edit your podcasts and polish the final product.
Tip: Start with the basics and upgrade as needed. Don’t overspend on equipment before you’ve fully committed to podcasting.
- Plan for Future Growth
Podcasting is a dynamic medium, and your show may evolve over time. As your podcast grows, you’ll likely want to add more equipment, accommodate guests, or even start recording video podcasts. Therefore, it’s important to set up a studio that can accommodate future needs.
Here’s how you can plan for growth:
Space: Choose a recording space that can accommodate additional equipment and guests.
Expansion: Invest in equipment that can be upgraded or expanded, like a multi-mic setup or a video recording system.
Tip: Consider flexibility when choosing furniture and equipment. Modular pieces that can easily be rearranged are ideal for growing setups.
- Test and Fine-Tune Your Setup
Once your studio is set up, it’s time to test your equipment and fine-tune everything before recording your first episode. Check your sound quality, adjust the microphone levels, and ensure there’s no background noise. Recording a sample episode will help you identify any areas that need improvement.
Tip: Don’t rush the setup. Take your time to perfect your audio, and make adjustments based on the sound quality and your needs.
Soundproofing a Podcasting Studio with Foam
Setting up a home podcasting studio is an exciting first step toward sharing your voice with the world, and one of the most crucial aspects of ensuring professional sound quality is acoustic treatment. Acoustic foam products are essential for minimizing unwanted noise, echoes, and reverb, allowing your podcast to have clear, crisp sound from the start.
Investing in high-quality acoustic foam panels, bass traps, and corner absorbers can drastically improve your sound quality by absorbing excess sound waves and enhancing audio clarity. By properly soundproofing your space with these products, you’ll create a more controlled environment that eliminates distractions, making it easier to record high-quality content.
Whether you’re just starting out or planning to expand your setup, choosing the right acoustic foam solutions is key to creating a podcast that stands out for its professional sound. Start with basic foam panels to reduce noise and build up your studio over time as your show grows. With the right tools and acoustic treatments, you’ll be on your way to recording and producing a podcast that not only sounds great but also keeps listeners coming back for more.

